1. Isingeniso
This manual provides essential instructions for the safe and efficient operation of your SINGER Start 1306 Sewing Machine. Please read it thoroughly before using the machine to ensure proper setup, usage, and maintenance. The SINGER Start 1306 is designed for home sewing projects, featuring 6 built-in stitches, easy threading, and a 4-step buttonhole function.

Isithombe 1.1: Ngaphambili view of the SINGER Start 1306 Sewing Machine.
2. Ulwazi Lokuphepha
Ngaso sonke isikhathi landela izinyathelo zokuphepha eziyisisekelo lapho usebenzisa izinto zikagesi ukuze unciphise ingozi yomlilo, ukushaqeka kukagesi, noma ukulimala.
- Funda yonke imiyalelo ngaphambi kokusebenzisa umshini.
- Keep the machine away from water or wet surfaces.
- Unplug the machine from the electrical outlet when not in use, when servicing, or when changing accessories.
- Never operate the machine if it has a damaged cord or plug, if it is not working properly, or if it has been dropped or damaged.
- Gcina iminwe kude nazo zonke izingxenye ezihambayo. Kudingeka ukunakekelwa okukhethekile ezungeze inaliti yomshini wokuthunga.
- Sebenzisa izesekeli ezinconywe umenzi kuphela.
- Ungalokothi uwise noma ufake noma iyiphi into kunoma yikuphi ukuvuleka.
3. Setha
3.1 Ukuqaqa kanye Nokuqukethwe
Carefully remove the machine from its packaging. Retain all packaging materials for future transport or storage. Verify that all included components are present:
- All-Purpose Foot
- Unyawo Zipper
- Unyawo Lwenkinobho
- I-Darning Plate
- Iphakethe Lezinaliti
- Bobbins
- Spool Pin Felts
- Isikulufu Sokushayela Ipuleti Lenaliti
- Seam Ripper / Lint Brush
- Vinyl Dust Cover
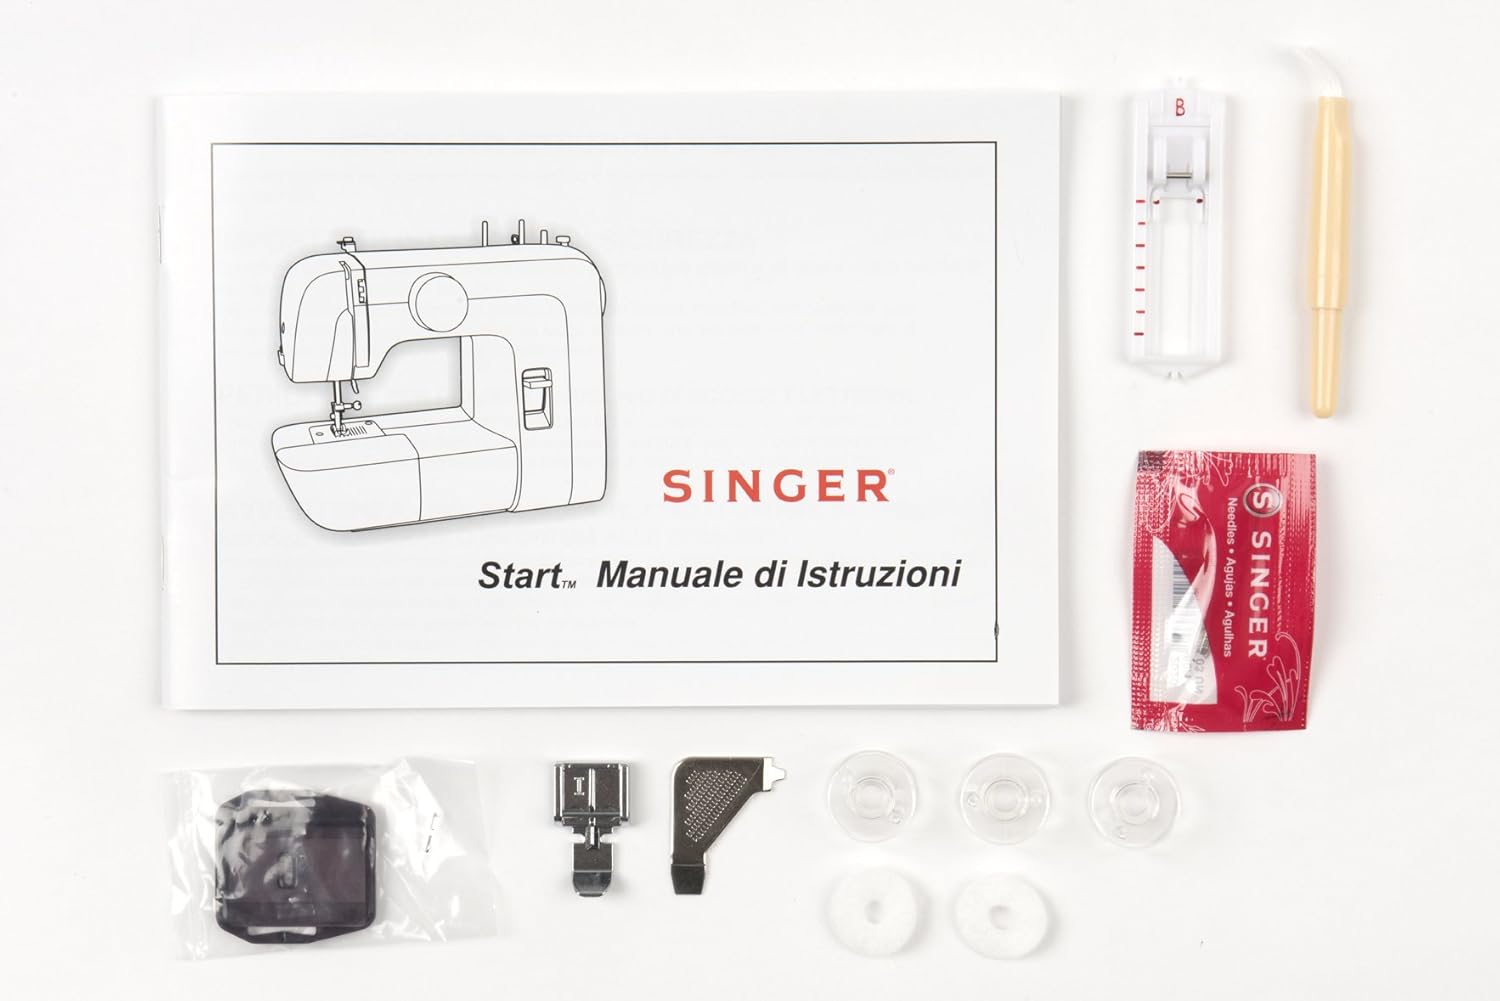
Image 3.1: Included accessories and instruction manual.
3.2 Ukuxhuma Amandla
Connect the power cord to the machine's power input socket and then plug it into a suitable electrical outlet (220V). Ensure the machine is switched off before connecting to power.

Isithombe 3.2: Emuva view showing power input and foot pedal connection.
3.3 Ukufaka Uchungechunge Emshinini
Correct threading is crucial for proper stitch formation.
3.3.1 Ukugoba Kwe-Bobbin
- Beka i-spool yentambo kuphini le-spool.
- Qondisa intambo ngesiqondiso sentambo esiphezulu.
- Wrap the thread clockwise around the bobbin winding tension disc.
- Insert the thread through the small hole in the bobbin from the inside out.
- Place the bobbin onto the bobbin winder spindle and push the spindle to the right.
- Hold the thread end and press the foot pedal. Wind a few turns, then trim the excess thread.
- Continue winding until the bobbin is full. The winder will stop automatically.
- Push the bobbin winder spindle to the left and remove the bobbin.
3.3.2 Ukufaka iBobbin
- Vula ipuleti lesembozo se-bobbin.
- Insert the wound bobbin into the bobbin case with the thread unwinding counter-clockwise.
- Guide the thread into the tension spring slot and pull it firmly until it snaps into place.
- Vala ipuleti lesembozo se-bobbin.
3.3.3 Ukuhlanganisa Okuphezulu
- Raise the needle to its highest position using the handwheel.
- Phakamisa umshayeli wezinyawo zokucindezela.
- Beka i-spool yentambo kuphini le-spool.
- Qondisa intambo ngesiqondiso sentambo esiphezulu.
- Bring the thread down through the right channel, then up through the left channel, ensuring it passes through the take-up lever.
- Faka inaliti kusukela ngaphambili uye emuva.

Image 3.3: Illustration of the upper threading path.
3.4 Ukufakwa Kwenaliti
To install or replace a needle:
- Vula isondo lesandla ukuze uphakamisele inaliti endaweni yayo ephezulu kakhulu.
- Khulula inaliti clamp isikulufa.
- Susa inaliti endala.
- Insert the new needle with the flat side facing the back of the machine. Push it up as far as it will go.
- Qinisa inaliti clamp isikulufu ngokuphepha.

Image 3.4: Close-up of the needle and presser foot area.
4. Iziqondiso Zokusebenza
4.1 Ukukhetha Ukuthunga
The SINGER Start 1306 offers 6 built-in stitch patterns. Turn the stitch selector dial to choose your desired stitch. The available stitches include 4 basic, 1 decorative, and 1 buttonhole stitch.

Image 4.1: Stitch selector dial with various stitch patterns.
4.2 Izisekelo Zokuthunga
4.2.1 Starting a Seam
- Place the fabric under the presser foot, aligning the edge with a seam guide on the needle plate.
- Yehlisa unyawo lokucindezela.
- Turn the handwheel to lower the needle into the fabric at the starting point.
- Press the foot pedal gently to begin sewing.
4.2.2 Finishing a Seam
- Sew to the end of your seam.
- Press the reverse stitch lever to sew a few stitches backward to secure the seam.
- Phakamisa inaliti endaweni yayo ephezulu.
- Phakamisa unyawo lokucindezela.
- Pull the fabric away from the machine, then cut the threads using the thread cutter on the machine.
4.3 4-Step Buttonhole Function
The machine features a 4-step buttonhole function for creating buttonholes. Refer to the markings on the stitch selector dial for each step (1, 2, 3, 4). Use the buttonhole foot for best results.
4.4 Zipper Insertion
Attach the zipper foot to the machine. This foot allows you to sew close to the zipper teeth, ensuring a neat finish. Follow standard zipper insertion techniques, adjusting the needle position as needed.
4.5 Free Arm Usage
The removable free arm provides access to difficult-to-reach areas such as collars, sleeves, cuffs, and pant hems. To use, slide off the accessory storage compartment to expose the free arm.
5. Isondlo
5.1 Ukuhlanza
Regular cleaning helps maintain machine performance. Always unplug the machine before cleaning.
- Ukususwa kwe-Lint: Use the provided lint brush to remove lint and dust from the bobbin area and feed dogs.
- Ukuhlanza Ingaphandle: Wipe the exterior surfaces with a soft, dry cloth. Do not use harsh chemicals or abrasive cleaners.
5.2 Ukufakwa Kwenaliti Esikhundleni
Replace needles regularly, especially when sewing different fabric types or if the needle becomes bent or dull. A damaged needle can cause skipped stitches or fabric damage. Refer to section 3.4 for needle installation instructions.
6. Ukuxazulula izinkinga
Lesi sigaba sikhuluma ngezinkinga ezivamile ongahlangabezana nazo. Ngezinkinga ezingabaliwe lapha, xhumana nokwesekwa kwamakhasimende.
| Inkinga | Imbangela Engenzeka | Isixazululo |
|---|---|---|
| Imithungo Eyeqiwe | Incorrect needle, bent needle, improper threading. | Replace needle, re-thread machine, ensure correct needle type for fabric. |
| Ukuphulwa Kwentambo | Incorrect threading, tension too tight, damaged needle, poor quality thread. | Re-thread, adjust tension, replace needle, use good quality thread. |
| Bobbin Thread Jamming | Improperly wound bobbin, incorrect bobbin insertion, lint in bobbin case. | Re-wind bobbin, re-insert bobbin correctly, clean bobbin area. |
| Umshini Awuqali | Power cord not connected, machine switched off, foot pedal not connected. | Check power connections, ensure switch is ON, connect foot pedal. |
7. Imininingwane
| Isici | Imininingwane |
|---|---|
| Ibhrendi | ISINGER |
| Inombolo Yemodeli | Iqala ngo-1306 |
| Isisindo sento | 4.3 kg |
| Ubukhulu bomkhiqizo (LxWxH) | 35 x 18 x 29 cm |
| Voltage | 220V |
| Wattage | 70 Watts |
| Izithungo Ezakhelwe ngaphakathi | 6 (4 basic, 1 decorative, 1 buttonhole) |
| Uhlobo lwembobo yenkinobho | Okuzenzakalelayo okunezinyathelo ezine |
| I-Frame Material | Heavy Duty Metal |
| Izingxenye Ezihlanganisiwe | All Purpose Foot, Zipper Foot, Buttonhole Foot, Darning Plate, Pack of Needles, Bobbins, Spool Pin Felts, Needle Plate Screwdriver, Seam Ripper / Lint Brush, Vinyl Dust Cover |

Image 7.1: Product dimensions of the SINGER Start 1306 Sewing Machine.
8. Iwaranti kanye Nokusekela
Your SINGER Start 1306 Sewing Machine comes with a manufacturer's warranty. Please refer to the warranty card included with your product for specific terms, conditions, and duration. For technical assistance, service, or to inquire about replacement parts, please contact SINGER customer support through their official webisayithi noma imininingwane yokuxhumana enikezwe kumadokhumenti akho ewaranti.


