
1. Isingeniso
The Gavdhe GDA01 Fingerprint Door Lock offers a secure and convenient keyless entry solution for your home, office, bedroom, or apartment. This smart door lock provides multiple access options including fingerprint, mobile app, and mechanical key. It features ultra-fast fingerprint recognition, app control for user management and access logs, an app-activated interior lockable mode, and an auto-lock function with adjustable delay. For enhanced smart home integration, it supports voice control via Alexa or Google Assistant when paired with a separately sold Gavdhe gateway. This manual provides detailed instructions for installation, setup, operation, and maintenance of your Gavdhe GDA01 Fingerprint Door Lock.
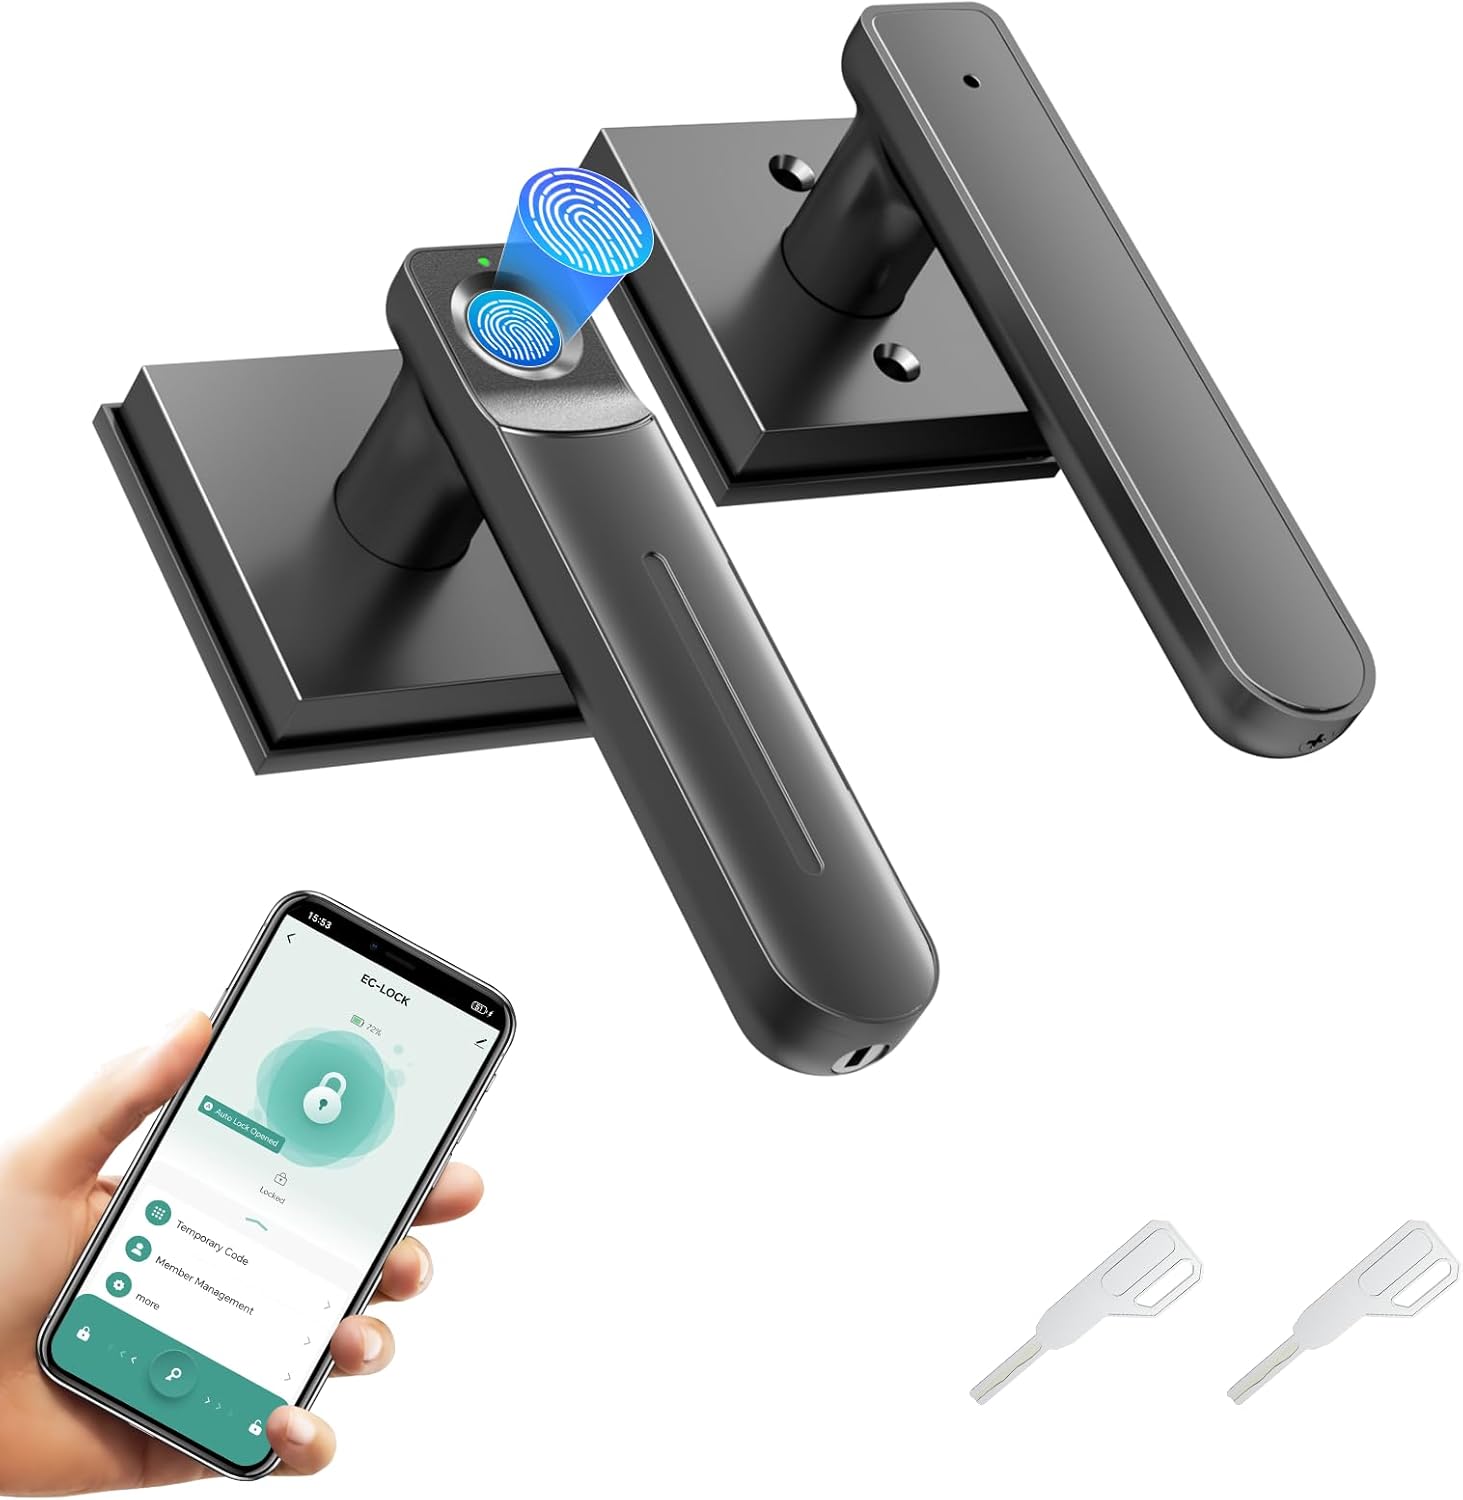
Figure 1: Gavdhe GDA01 Fingerprint Door Lock
2. Okuqukethwe Kwephakheji
Qinisekisa ukuthi zonke izingxenye zikhona kuphakheji yakho:
- 1 x Front Knob
- 1 x Rear Knob
- 1 x Adjustable Latch
- 1 x Strike Plate and Reinforcer
- 2 x Okhiye
- 1 x Phina
- 1 x Isipindi
- 2 x Threaded Pillars
- 6 x Izikulufu
- 1 x Type-C Cable (for emergency power only)
- 1 x Incwadi Yomsebenzisi
- 1 x Drill Isifanekiso
- 1 x Spare Package
3. Imininingwane
| Isici | Ukucaciswa |
|---|---|
| Okubalulekile | I-Aluminium |
| Ibhrendi | Gavdhe |
| Umbala | Mnyama |
| Isitayela | 3-in-1 fingerprint door knob with APP |
| Ubukhulu bomkhiqizo | 5.6"L x 2.75"W |
| Ingaphandle Qeda | I-Aluminium Epholishiwe |
| Isimo | Isikwele |
| Uhlobo lwesibambo | Ingquza |
| Uhlobo lokukhiya | Khiya ukhiye |
| I-Smart Home Compatibility | Smart Home Compatible (with optional gateway) |
| Isisindo sento | 1.75 Amakhilogremu |
4. Ukufakwa
Follow these steps to install your Gavdhe GDA01 Fingerprint Door Lock. For a visual guide, please refer to the installation video below.
Video 1: Gavdhe GDA01 Fingerprint Door Lock Installation Tutorial
This video provides a step-by-step guide on how to install the Gavdhe GDA01 Fingerprint Door Lock, including latch adjustment, handle installation, and battery connection.
- Adjust the Latch Backset (if needed):
Hold the latch in front of the door hole, ensuring the latch face is flush against the door edge. If the latch holes are centered in the door hole (60mm or 2-3/8in), no adjustment is required. Proceed to Step 2. If the latch holes are NOT centered (70mm or 2-3/4in), adjust the latch by pushing and rotating the mechanism until it extends to the correct length.
- Faka i-Latch:
Insert the adjusted latch into the door edge. Ensure the square hole on the latch is horizontal. Secure it with the provided screws.
- Faka Isibambo Sangaphambili:
Route the wiring through the square spindle. Insert the square spindle into the square spindle hole on the front handle, ensuring it fits squarely without tilting. Secure and tighten the threaded pillars.

Figure 2: Installation Diagram with Door Dimensions
- Install the Back Handle:
Remove the battery cover from the back handle. Route the wire through the back panel. Fix the back handle with screw B. Qaphela: When fixing the inner screw B, you may need to press the handle down slightly to insert the screw and tighten it through the hole in the back handle.
- Insert Batteries and Connect Wiring:
Insert 4 AAA Alkaline batteries (batteries not included) into the battery compartment. Connect the wire on the battery box, ensuring a tight wire connection. Install the battery cover back.
Inothi elibalulekile: For best performance, we recommend using 4 AAA alkaline batteries. If you choose to use rechargeable batteries, do not charge them via the Type-C port, as this may damage the internal components. The Type-C port is for temporary emergency power only.

Figure 3: Type-C Port for Emergency Power
5. Iziqondiso Zokusebenza
Your Gavdhe GDA01 Fingerprint Door Lock offers multiple ways to access. For app setup and advanced features, please refer to the setup video below.
Video 2: Gavdhe GDA01 Fingerprint Door Lock Setup Video
This video demonstrates how to register the app, add your lock, add fingerprints, enable passage mode, set auto-lock delay, add common members, enable electronic anti-lock, and pair with a gateway for remote unlocking.
5.1. Access Options
The lock supports three primary access methods:
- I-fingerprint: Place your registered fingerprint on the sensor for quick unlocking.
- Ukulawulwa kohlelo lokusebenza: Use the Tuya Smart App on your smartphone to unlock the door remotely (with gateway) or via Bluetooth.
- Ukhiye Wemishini: Sebenzisa okhiye abangokoqobo abanikeziwe njengesipele.

Figure 4: 3-in-1 Access Options
5.2. Tuya Smart App Setup
- Landa futhi Ubhalise: Download the Tuya Smart App from Google Play or the App Store. Register an account by filling in your mobile number or email, agreeing to terms, getting a verification code, and setting a password.
- Add Your Lock (Method 1 - Auto-discovery):
- Vula i-Bluetooth yefoni yakho.
- Vula i-Tuya Smart App.
- Click the "+" icon or "Add Device".
- The app will automatically detect and pop up "EC-DA01". Click "Add".
- After successful addition, click the pencil icon to name the lock. Click "Finish".
- Add Your Lock (Method 2 - Manual selection):
- Vula i-Bluetooth yefoni yakho.
- Vula i-Tuya Smart App.
- Click the "+" icon or "Add Device".
- Tap "Camera & Lock" and then select "Lock (BLE)".
- Follow the on-screen prompts to reset the device and connect.
- After successful addition, click the pencil icon to name the lock. Click "Finish".

Figure 5: Convenient App Control Interface
5.3. Ukwengeza Izigxivizo Zeminwe
You can store up to 100 fingerprints for convenient access.
- In the app, tap "Member Management".
- Tap "Me Admin".
- Tap "Fingerprint - Add".
- Bhalisa izigxivizo zeminwe: Firmly press your finger on the sensor. Repeat 5 times from different angles to ensure full registration. Wait for the app to confirm "Added".
- Name the fingerprint (e.g., "Left Thumb"). Tap "OK".
- Test Immediately: Verify unlock with the newly registered finger.
- Repeat steps 1-6 for additional fingerprints.
5.4. Enabling Passage Mode
Passage mode keeps the door unlocked, allowing free entry and exit without verification. This is useful for gatherings or when frequent access is needed.
- In the app, tap "More".
- Toggle OFF "Auto Lock".
- Activate with Biometric Verification: Place a registered fingerprint on the sensor. Wait for a confirmation beep.
Active Mode Status: The door remains unlocked, and no verification is required for access. Inothi Lokuphepha: Activate passage mode only in secure areas. To re-enable auto-lock, toggle it ON in the app.
5.5. Setting Auto-Lock Delay
The auto-lock feature automatically locks the door after a set delay.
- In the app, tap "More".
- Toggle ON "Auto Lock".
- Tap "Auto Lock Delay".
- Adjust the delay time between 1 second and 2 minutes 59 seconds.
- Cindezela okuthi "KULUNGILE" ukuze uqinisekise.
Izici Eziyinhloko: The door automatically locks after the selected delay. The default delay is 5 seconds if not set.

Figure 6: Auto-Lock Delay Setting
5.6. Electronic Anti-Lock & Common Members
The electronic anti-lock feature provides extra security by preventing external unlocking (except by admin or mechanical key) when activated.
- Add Common Member:
- Tap "Member Management".
- Click "+" to add a new member.
- Select "Common Member" type.
- Enter member information.
- Enable Electronic Anti-Lock:
- Tap "More".
- Toggle ON "Electronic anti-lock".
Amanothi Abalulekile: When Anti-Lock is active, admin credentials (fingerprint/code/IC card) work normally, but common member credentials are temporarily disabled. Disable this feature when not needed.

Figure 7: Electronic Anti-Lock Security from Inside
5.7. Remote Unlocking & Voice Control (with Gavdhe Gateway)
To enable remote unlocking and voice control features, a Gavdhe Gateway (sold separately) is required.
- Add Gateway & Pair with Lock:
- Lungiselela Ifoni: Turn on Bluetooth. Open the Tuya Smart App.
- Qala Ukumisa: Tap "+" or "Add Device". Select the detected Gateway. Tap "Add".
- Xhuma ku-WiFi: Enter your WiFi credentials (2.4GHz recommended).
- Qedela Ukumisa: After successful setup, tap the pencil icon to rename the Gateway. Click "Done". Select your lock, tap "Associate To" and confirm "Associating".
- Ukuvula Isilawuli kude:
- Vula i-Tuya Smart App.
- Select your Gateway.
- Tap "EC-Lock".
- Swipe right to unlock.
Requirements for Remote Unlocking: The gateway must be online, and your phone needs internet access.

Figure 8: Remote Unlocking with Gavdhe Gateway

Figure 9: Voice Control via Gavdhe Gateway
6. Isondlo
Proper maintenance ensures the longevity and optimal performance of your Gavdhe GDA01 Fingerprint Door Lock.
- Ukushintshwa Kwebhethri: The lock is powered by 4 AAA Alkaline batteries. Replace them when the low-battery alerts are triggered.
- Ukuhlanza: Regularly wipe the fingerprint sensor and the lock body with a soft, dry cloth. Avoid using abrasive cleaners or solvents that could damage the finish or electronic components.
- Amandla Aphuthumayo: In case of complete battery depletion, use the Type-C emergency port with a power bank to temporarily power the lock and gain access.
7. Ukuxazulula izinkinga
If you encounter issues with your Gavdhe GDA01 Fingerprint Door Lock, refer to the following common troubleshooting steps:
- Handle Not Working After Installation: Ensure the lock is fully installed, batteries are inserted, and wires are correctly connected. The fingerprint handle only activates after full installation and battery power.
- Izigxivizo zeminwe Awaziwa: Ensure your finger is clean and dry. Try pressing your finger firmly and from different angles on the sensor. Re-register your fingerprint if the issue persists.
- Ibhethri Eliphansi: The lock will provide low-battery alerts. Replace the 4 AAA Alkaline batteries promptly. If completely drained, use the Type-C port for emergency power.
- Izinkinga Zokuxhumanisa Uhlelo Lokusebenza: Ensure your phone's Bluetooth is on and the lock is within range. If using a gateway, ensure the gateway is online and connected to a stable 2.4GHz Wi-Fi network.
- Buyisela kokuzenzakalelayo kwasefekthri: If persistent issues occur, you can restore the lock to its factory settings via the app. In the app, tap the pencil icon (edit), then "Remove Device", then "Disconnect and wipe data", and finally "Confirm". This will delete all registered data.

Figure 10: Why Isn't My Handle Working Yet?
8. Iwaranti
The Gavdhe GDA01 Fingerprint Door Lock comes with a standard manufacturer's warranty. Please refer to the warranty card included in your package or contact customer support for specific details regarding coverage and duration.
9. Ukusekela
For further assistance, technical support, or any inquiries regarding your Gavdhe GDA01 Fingerprint Door Lock, please contact us:
- I-imeyili: Support@gavdhe.com
Enjoy Your Smart Life! We're Always here for you.