Isingeniso
The ASHATA 4 Channel Dash Cam is designed to provide comprehensive vehicle monitoring, capturing high-definition video footage from multiple angles. This device features a 1080P recording resolution, a 170-degree wide-angle front camera, and additional cameras for rear, left, and right views. Equipped with a 2.0-inch HD screen, night mode capabilities, and emergency recording functions, it ensures detailed surveillance for enhanced driving safety and incident documentation.

This image illustrates the high-definition recording capability of the dash cam, capturing clear details of the road ahead.
Okuqukethwe Kwephakheji
Sicela uqinisekise ukuthi zonke izinto ezibalwe ngezansi zifakiwe kuphakheji yakho:
- 1 x Dash Cam (Main Unit)
- 1 x Dash Cam Power Cord (Type-C)
- 1 x Reversing Camera
- 1 x Reversing Camera Connecting Cable
- 2 x Izikulufu
- 1 x License Plate Sticker
- 1 x Adhesive Mount
- 1 x Incwadi Yomsebenzisi (Lo mbhalo)
- 1 x Protective Film

This image displays all items found in the product package, including the dash cam, power cord, reversing camera, connecting cables, screws, license plate sticker, adhesive mount, and protective film.
Setha
Follow these steps to set up your ASHATA 4 Channel Dash Cam:
- Faka Imemori Yekhadi: Locate the memory card slot on the dash cam. Insert a compatible memory card (up to 32GB, Class 10 or higher recommended) into the slot. Ensure it is inserted correctly until it clicks into place.
- Mount the Main Dash Cam: Use the provided adhesive mount to securely attach the main dash cam unit to your vehicle's windshield, ensuring it has a clear view of the road ahead. Position it so it does not obstruct your driving view.
- Install the Reversing Camera: Mount the reversing camera at the rear of your vehicle, typically near the license plate. Use the provided screws and license plate sticker for secure attachment. Connect the reversing camera to the main dash cam using the reversing camera connecting cable. For automatic display when reversing, connect the reversing camera's power wire to your vehicle's backup light power source.
- Xhuma Amandla: Plug the Type-C dash cam power cord into the main dash cam unit and connect the other end to your vehicle's 12V power outlet (cigarette lighter socket). The device is designed for plug-and-play operation.
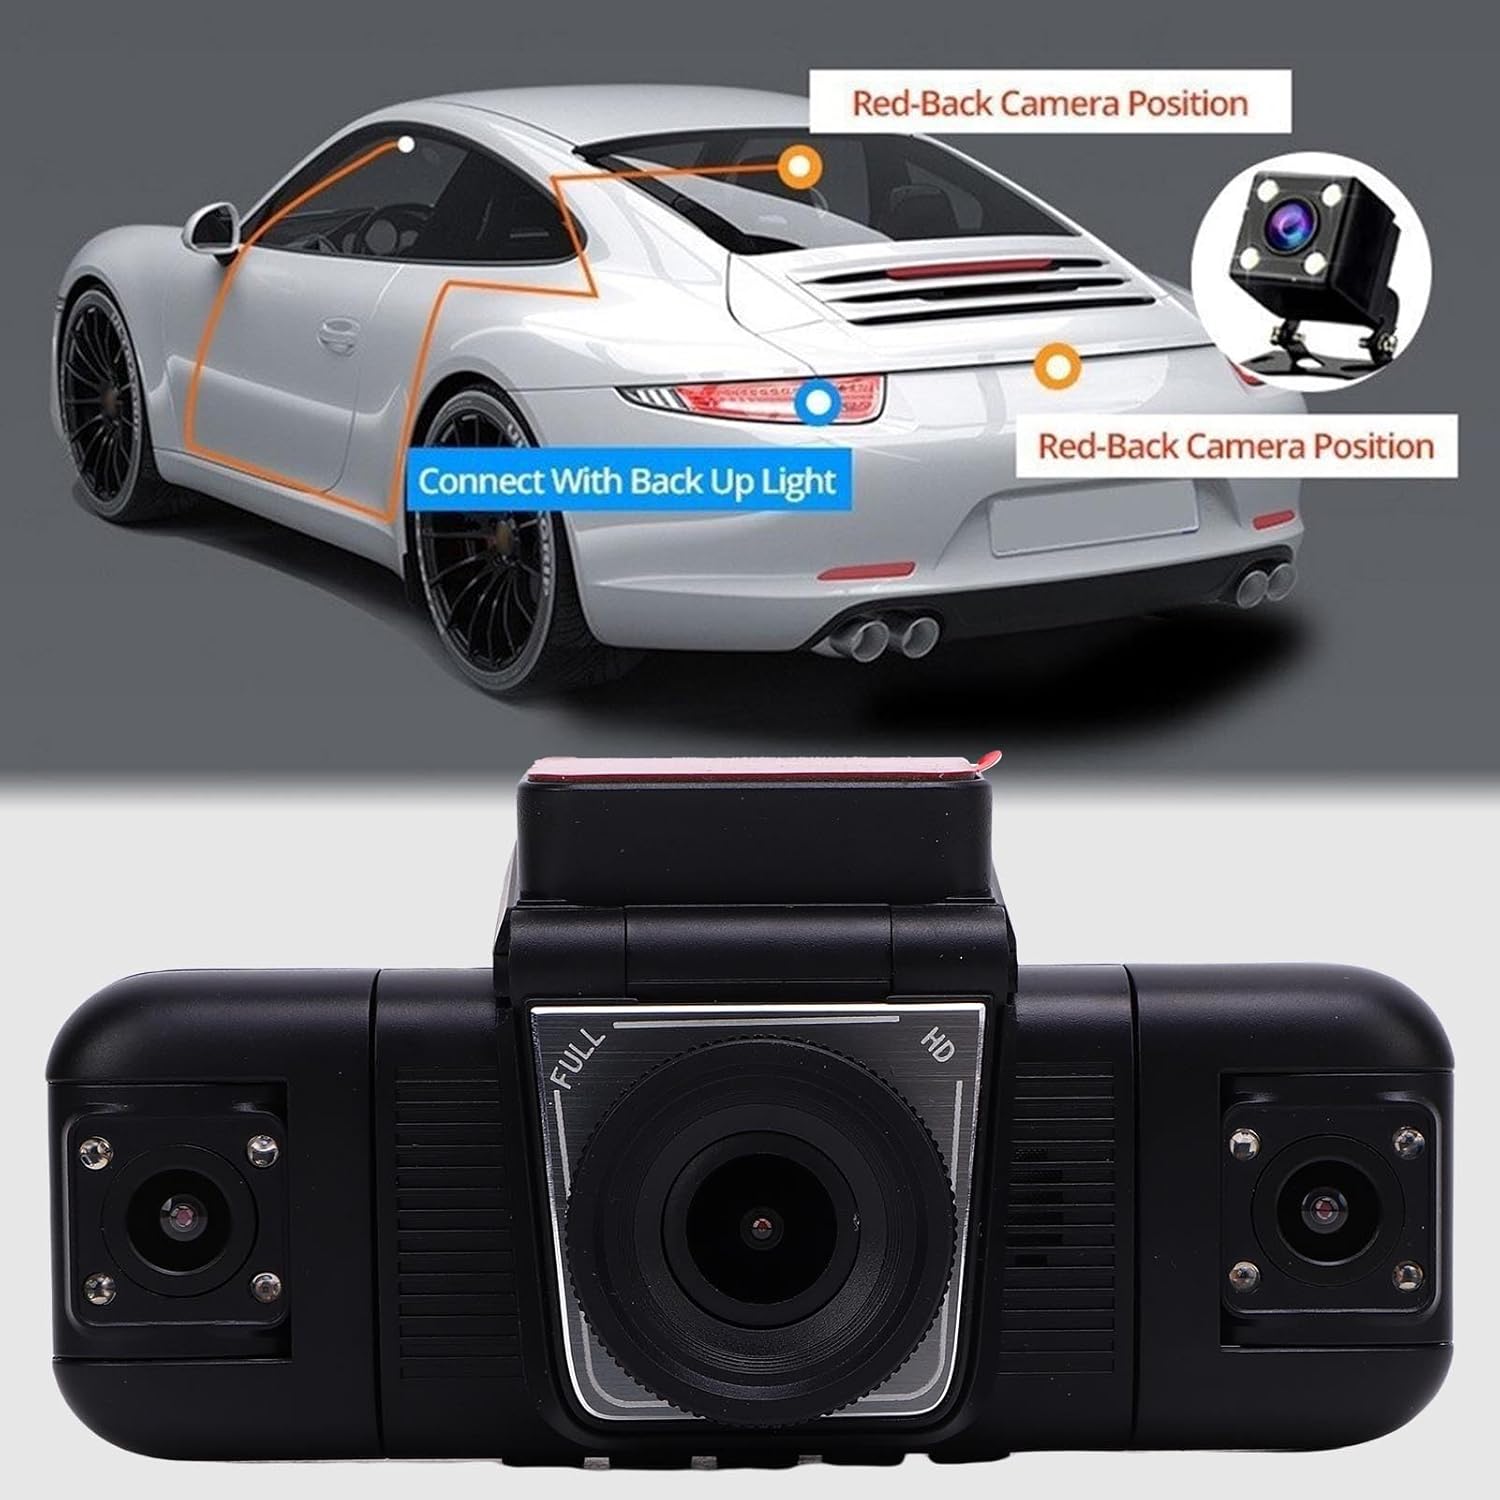
This image provides guidance on installing the reversing camera, showing its placement at the rear of the vehicle and connection to the backup light for automatic activation.
Imiyalelo yokusebenza
Understand the key functions and operations of your dash cam:
- Vula/Vala: The dash cam will typically power on automatically when your vehicle starts and power off when the engine is turned off. You can also manually power it on or off using the designated button.
- Ukuqoshwa kwe-Loop: This feature ensures continuous recording by automatically overwriting the oldest footage when the memory card is full. Ensure this function is enabled in the settings to prevent storage issues.
- G-Sensor (Emergency-Lock): The built-in G-sensor detects sudden impacts or emergency braking and automatically locks the current video segment, preventing it from being overwritten by loop recording. This footage is saved in a separate, protected folder.
- Automatic Reverse Display: When the reversing camera is properly installed and connected to your vehicle's backup light, the 2.0-inch display will automatically switch to the rear camera view when you engage reverse gear, assisting with parking and maneuvering.
- 4-Camera Full View: The dash cam records simultaneously from the front (170°), interior (120°), and rear (100°) cameras, providing comprehensive coverage. The 2.0-inch screen allows real-time viewing of these feeds.

This graphic demonstrates the comprehensive 4-channel coverage provided by the dash cam, including views from the front, rear, left, and right of the vehicle.
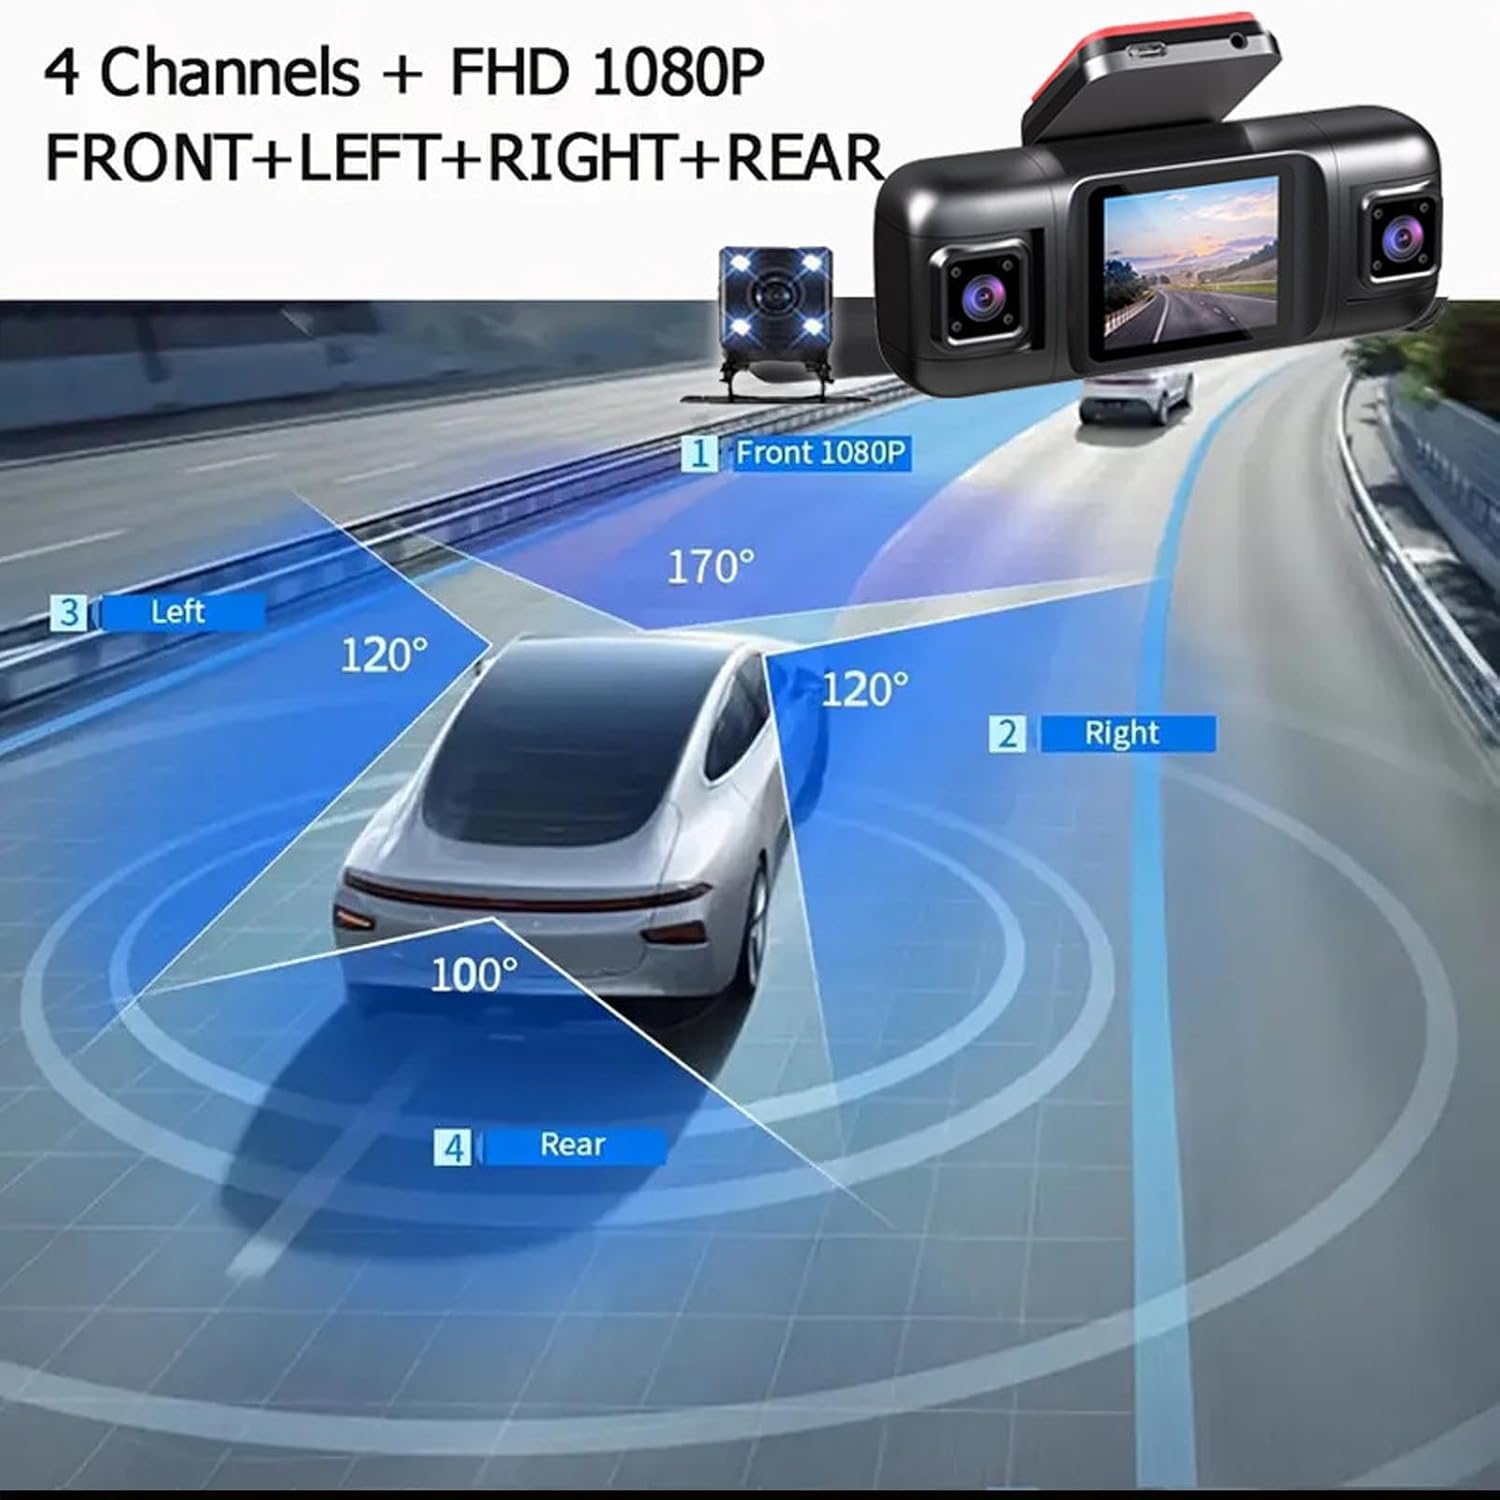
A visual representation of the dash cam's wide-angle lenses, showing the 170-degree front view, 120-degree side views, and 100-degree rear view for complete vehicle surveillance.

This image highlights the main dash cam unit with its 2.0-inch display and the included rear camera, emphasizing the intelligent driving recorder features.

This graphic details key operational features: Loop Recording for continuous recording, Emergency-Lock for collision events, and Parking Monitor for surveillance when the vehicle is parked.

Indiza view diagram demonstrating the field of view for each of the four cameras: front, left, right, and rear, providing comprehensive coverage around the vehicle.
Isondlo
To ensure optimal performance and longevity of your dash cam, consider the following maintenance tips:
- Fometha Imemori Yekhadi: Regularly format your memory card (e.g., once a month) to prevent data corruption and ensure smooth loop recording. This can usually be done through the dash cam's settings menu.
- Hlanza Amalensi: Periodically clean the camera lenses with a soft, lint-free cloth to remove dust, smudges, or dirt that could affect video clarity.
- Hlola Ukuxhumana: Ensure all cables and connections are secure and free from damage. Loose connections can lead to intermittent power or recording issues.
- Ukucatshangelwa kwezinga lokushisa: Avoid exposing the dash cam to extreme temperatures for extended periods, as this can affect battery life and electronic components.
Ukuxazulula inkinga
Uma uhlangabezana nezinkinga nge-dash cam yakho, bheka izinkinga ezilandelayo nezisombululo:
Dash Cam Storage Card Shows Full
If your dash cam indicates that the storage card is full, try the following steps:
- Verify Loop Recording: Ensure that the loop recording function on your device is turned ON. If it is not enabled, the memory will become full after recording, as older files ngeke ibhalwe phezu.
- Disable G-Sensor (Temporarily): If the G-sensor function is overly sensitive or constantly active, it may lock too many videos, preventing them from being deleted by loop recording and causing the memory to fill up. Try turning off the G-sensor temporarily to see if the issue resolves.
- Format or Replace Storage Card: If the above steps do not resolve the issue, please format the storage card through the dash cam's settings. If the problem persists, the memory card may be faulty or too slow. Consider purchasing a new high-speed memory card (at least Class 10).
Imininingwane
| Isici | Ukucaciswa |
|---|---|
| I-engeli yekhamera yangaphambili | 170° I-engeli ebanzi |
| Interior Camera Angle | 120° |
| Bonisa Usayizi Wesikrini | 2.0 amayintshi |
| Imbobo yokushaja | Uhlobo C |
| Ukulungiswa kwevidiyo | 1080P / 720P |
| Ukusekelwa Kwesitoreji | Up to 32GB Memory Card (not included, C10 recommended) |
| Uhlobo Lwebhethri | 150mAh Lithium-ion Battery (built-in) |
| Ubukhulu bomkhiqizo (D x W x H) | 7.87" x 4.33" x 2.76" |
| Inombolo Yemodeli | ASHATA423vmgf9ot |
Iwaranti
This ASHATA product is covered by a manufacturer warranty for 90 days from the date of purchase. Please retain your proof of purchase for any warranty claims. The warranty covers manufacturing defects but does not cover damage caused by misuse, accidents, or unauthorized modifications.
Ukusekela
For further assistance, technical support, or inquiries regarding your ASHATA 4 Channel Dash Cam, please contact ASHATA customer service through their official website or the retailer from whom you purchased the product. Please have your model number (ASHATA423vmgf9ot) and purchase details ready when contacting support.