1. Isingeniso
This manual provides instructions for the assembly, operation, and maintenance of the MONTECH X5M Micro ATX Gaming PC Case. The X5M is designed for high airflow and features pre-installed ARGB fans, a glass side panel, and an integrated GPU holder.
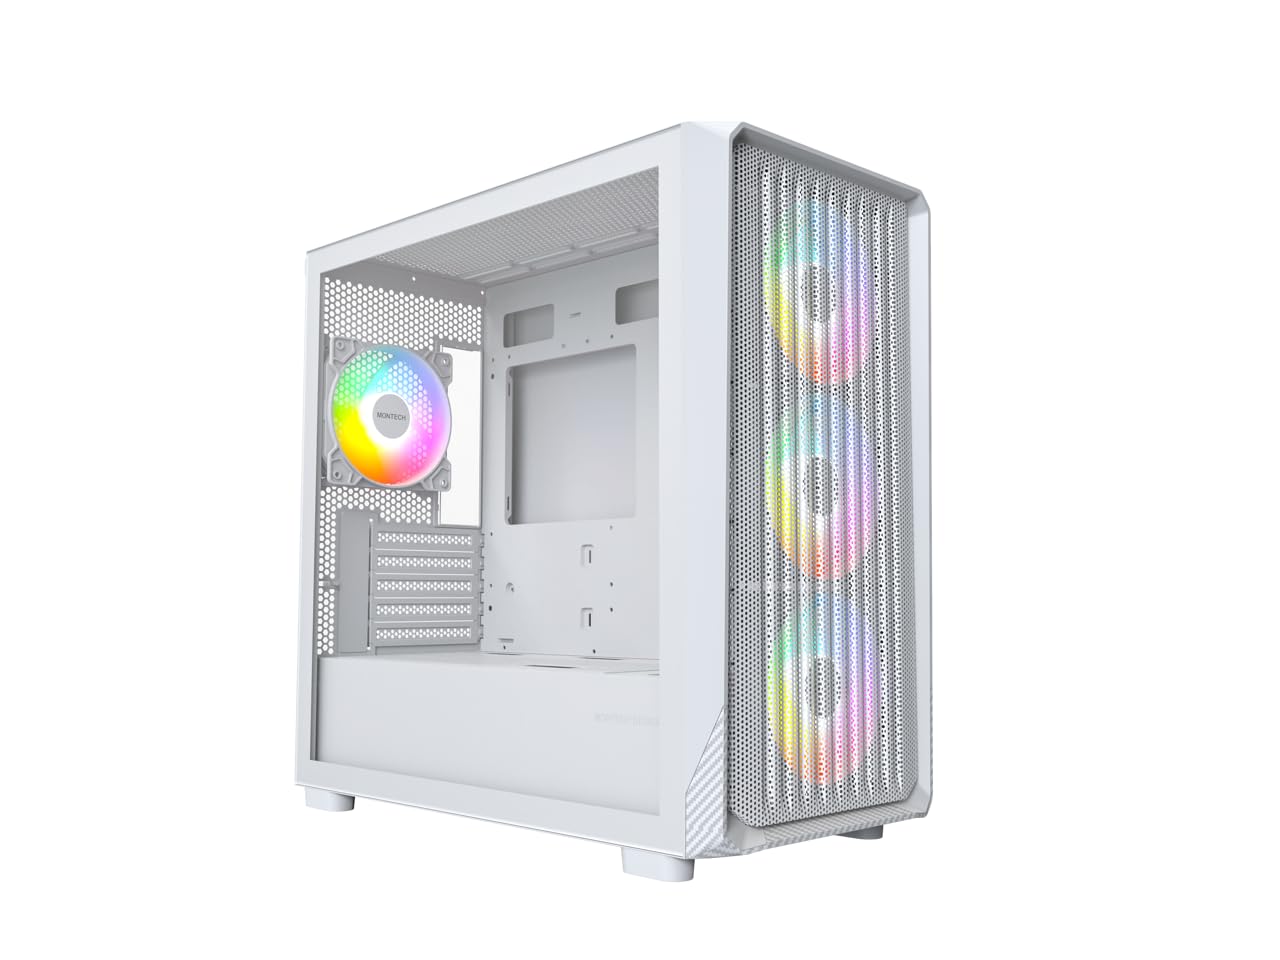
Figure 1: MONTECH X5M Micro ATX Gaming PC Case (White variant).
2. Izici Eziyinhloko
- Integrated GPU Holder: An adjustable GPU support stand is included to provide physical support for graphics cards.
- High Airflow Design: Optimized structure for efficient cooling.
- Pre-installed ARGB Fans: Four 120mm ARGB fans are pre-installed for immediate cooling and customizable lighting.
- Iphaneli Eseceleni Yengilazi Ethambile: Inikeza okucacile view izingxenye zangaphakathi.
- Carbon Fiber Print Accents: Aesthetic detailing on the front panel.
- Ukuxhumana Okuhlukahlukene: Front I/O panel includes USB 2.0, USB 3.0, USB Type-C, and audio ports.

Umdwebo 2: Ngaphezuluview of the MONTECH X5M case highlighting internal layout and ARGB fans.
3. Imininingwane
| Ibhrendi | Montech |
| Igama Lemodeli | X5M |
| Uhlobo Lwekesi | I-Micro ATX Mid Tower |
| Ukuhambisana kwe-Motherboard | I-Micro ATX |
| Abalandeli abafakwe ngaphambilini | 4 x 120mm Abalandeli be-ARGB |
| GPU Length Support | Kufika ku-405mm |
| CPU Cooler Height Support | Kufika ku-165mm |
| PSU Length Support | Kufika ku-230mm |
| Izitolo Zokugcina | Up to 2 HDDs & 4 SSDs |
| Izimbobo zangaphambili ze-I / O | 1x USB 2.0, 1x USB 3.0, 1x USB Type-C, Mic & Audio, LED Button, Power Button |
| Indlela Yokupholisa | Umoya |
| I-AIO Radiator Support | Top: Up to 360mm; Front: Up to 360mm |
| Okubalulekile | Plastic with Carbon Fiber Accents, Tempered Glass |
| Isisindo sento | Amapondo ayi-14.3 (6.49 kg) |

Figure 3: Close-up of the carbon fiber print detailing on the front panel of the X5M case.
4. Ukusetha nokufakwa
Follow these steps for installing components into your MONTECH X5M PC case. Ensure your system is powered off and unplugged before beginning any installation.
4.1. Ukulungisa Icala
- Carefully remove the tempered glass side panel by unscrewing the thumb screws and sliding it off.
- Remove the rear side panel to access the cable management area.
4.2. Ukufakwa kwe-Motherboard
- Faka isivikelo se-I/O (uma singanamathiselwanga kusengaphambili ebhodini lakho le-motherboard) endaweni engemuva yebhokisi.
- Align your Micro ATX motherboard with the standoffs inside the case.
- Vikela i-motherboard usebenzisa izikulufu ezinikeziwe.
4.3. Ukufakwa Kweyunithi Yokunikezela Ngamandla (i-PSU).
- Place the PSU into the dedicated compartment at the bottom rear of the case.
- Vikela i-PSU ngezikulufo ngemuva kwekesi.
4.4. Storage Device Installation (HDDs/SSDs)
The X5M supports up to 2 HDDs and 4 SSDs.
- 2.5" ama-SSD: Mount SSDs onto the designated brackets behind the motherboard tray or on the PSU shroud.
- Ama-HDD angu-3.5": Install HDDs into the drive cage located under the PSU shroud.
4.5. Ukufakwa Kwekhadi Lezithombe (GPU).
- Susa amakhava we-PCIe slot adingekayo ngemuva kwekesi.
- Insert the GPU into the appropriate PCIe slot on your motherboard.
- Secure the GPU with screws.
- Adjust the integrated GPU support stand to provide stability for your graphics card.
4.6. Ukufakwa kwefeni ne-radiator
The X5M comes with four 120mm ARGB fans pre-installed. Additional fans or AIO radiators can be installed as follows:
- Phezulu: Supports 3x 120mm or 2x 140mm fans, or AIO radiators up to 360mm.
- Ngaphambili: Supports 3x 120mm or 2x 140mm fans, or AIO radiators up to 360mm.
- Ngemuva: Supports 1x 120mm fan.
- I-PSU Shroud: Supports 2x 120mm fans.

Figure 4: Illustration of airflow within the MONTECH X5M case and the pre-installed ARGB fans.

Figure 5: Diagram detailing fan and radiator support locations and sizes within the X5M case.
4.7. Ukuphathwa Kwentambo
Utilize the cable routing cutouts and tie-down points behind the motherboard tray to organize cables. This improves airflow and aesthetics.
4.8. Front I/O Panel Connections
Connect the front panel cables (USB 2.0, USB 3.0, USB Type-C, HD Audio, Power Switch, Reset Switch, LED) to the corresponding headers on your motherboard. Refer to your motherboard manual for specific header locations.

Figure 6: Front I/O panel of the MONTECH X5M, showing USB 2.0, USB 3.0, USB Type-C, Mic & Audio jacks, LED button, and Power button.
5. Ukusebenza
5.1. Ivula amandla
After all components are installed and cables connected, replace the side panels. Connect your monitor, keyboard, mouse, and power cable. Press the Power Button on the front I/O panel to start your system.
5.2. Ukulawulwa kwabalandeli be-ARGB
Amafeni e-ARGB afakwe ngaphambilini angalawulwa ngezindlela ezimbili:
- Dedicated LED Button: Use the LED button on the front I/O panel to cycle through 25 built-in lighting modes.
- Ukuvumelanisa Ibhodi Lomama: Connect the ARGB cables to a compatible 5V 3-pin ARGB header on your motherboard. Use your motherboard's RGB software (e.g., ASUS Aura Sync, MSI Mystic Light Sync, GIGABYTE RGB Fusion, ASRock Polychrome Sync) to synchronize and customize lighting effects.
6. Isondlo
Ukugcinwa njalo kusiza ukuqinisekisa ukusebenza kahle kanye nobude besikhathi sezingxenye ze-PC yakho.
- Ukuhlanza Isihlungi Sothuli: Periodically remove and clean the dust filters (located on the top, front, and bottom) to maintain optimal airflow. Use compressed air or a soft brush.
- Ukuhlanza Ingaphandle: Sula ingaphandle ngethafa elithambile, damp indwangu. Gwema izinto zokuhlanza abrasive.
- Ukuhlanzwa Kwangaphakathi: With the system powered off and unplugged, use compressed air to remove dust from internal components and fans.
7. Ukuxazulula izinkinga
- Isistimu Ayivuli:
- Ensure the power cable is securely connected to the PSU and the wall outlet.
- Check that the PSU switch is in the "ON" position.
- Verify all front panel connectors (especially the Power Switch) are correctly attached to the motherboard.
- Confirm the 24-pin ATX and 8-pin CPU power cables are securely connected to the motherboard.
- Abalandeli Abaphenduki / I-RGB Ayikhanyisi:
- Check that all fan power cables are securely connected to the fan hub or motherboard headers.
- Ensure ARGB cables are properly connected to the fan hub or a compatible 5V 3-pin ARGB header on the motherboard.
- If using motherboard synchronization, verify that the RGB software is installed and configured correctly.
- Try cycling through modes using the dedicated LED button on the front panel.
- Akukho okukhiphayo kokubonisa:
- Ensure your monitor cable is connected to the graphics card (GPU) and not the motherboard's integrated graphics port (unless you are using integrated graphics).
- Phinda ubeke ikhadi lehluzo endaweni yalo ye-PCIe.
- Check that the GPU power cables are securely connected.
8. Iwaranti kanye Nokusekela
8.1. Ulwazi Lwewaranti
The MONTECH X5M PC Case comes with a Iwaranti Yomkhiqizi Yonyaka ongu-1. This warranty covers defects in materials and workmanship under normal use. For specific terms and conditions, please refer to the official Montech webisayithi noma uxhumane nokwesekwa kwamakhasimende.
8.2. Ukwesekwa Kwamakhasimende
For further assistance, technical support, or warranty claims, please visit the official Montech website or contact their customer service department. You can find contact information on the Montech webindawo: www.montechpc.com