
ARRIS C250 V2
ARRIS C250 V2 250mm RC Quadcopter FPV Racing Drone
Incwadi Yeziqondiso
Isingeniso
This manual provides essential information for the safe and effective operation of your ARRIS C250 V2 250mm RC Quadcopter FPV Racing Drone. Please read this manual thoroughly before operating the drone to ensure proper setup, flight, and maintenance. The ARRIS C250 V2 is a high-performance FPV racing drone designed for experienced users.
Imihlahlandlela yokuphepha
- Hlala usebenzisa i-drone ezindaweni ezivulekile, kude nabantu, izilwane, izakhiwo, kanye nezithiyo.
- Maintain a safe distance from the drone during flight.
- Do not fly near airports or in restricted airspace. Check local regulations before flying.
- Ensure the battery is fully charged and securely mounted before each flight.
- Inspect propellers for damage before each flight. Replace any damaged propellers immediately.
- Ungalokothi uzame ukubamba i-drone ngenkathi ama-propeller ayo ejikeleza.
- Gwema ukundiza emoyeni onamandla noma esimweni sezulu esibi.
- Gcina izandla nobuso kude nama-propeller ajikelezayo.
- This product is not a toy and is intended for adult use only.
Umkhiqizo Uphelileview kanye Nezingxenye
The ARRIS C250 V2 is an advanced FPV racing drone featuring a robust design and integrated electronics for optimal performance. Key components include:
- ARRIS C250 V2 Frame
- Radiolink AT9 Transmitter and Receiver
- ARRIS 4S 1500mAh LiPo Battery
- ARRIS X2205 2300KV Brushless Motors
- Flycolor S-Tower 4-in-1 ESC + F3 Flight Controller + OSD + PDB
- ARRIS 5042 3-blade Propellers
- ARRIS XAT700M FPV Mini Camera
- 5.8G FPV Video Transmitter (TX) and Antenna
- I-Buzzer

Umdwebo 1: Ngaphezuluview of the ARRIS C250 V2 FPV Racing Drone with key components labeled, including motors, propellers, battery, FPV camera, and video transmitter.

Umfanekiso 2: Okuningiliziwe view highlighting the XT60 Female Plug, 4-in-1 ESC with FC, PDB Tower, and the 5.8G FPV Racing TX Antenna.
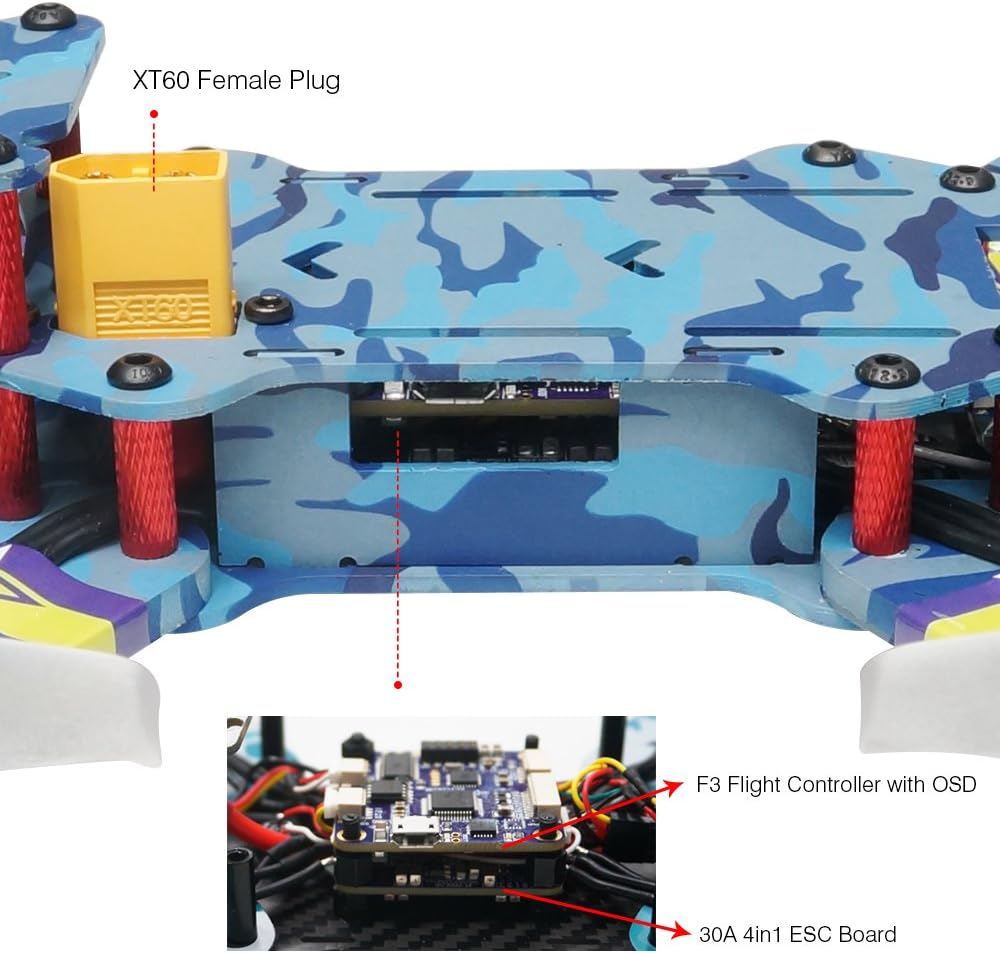
Figure 3: Close-up of the integrated Flycolor S-Tower, showing the F3 Flight Controller with On-Screen Display (OSD) and the 30A 4-in-1 ESC Board.
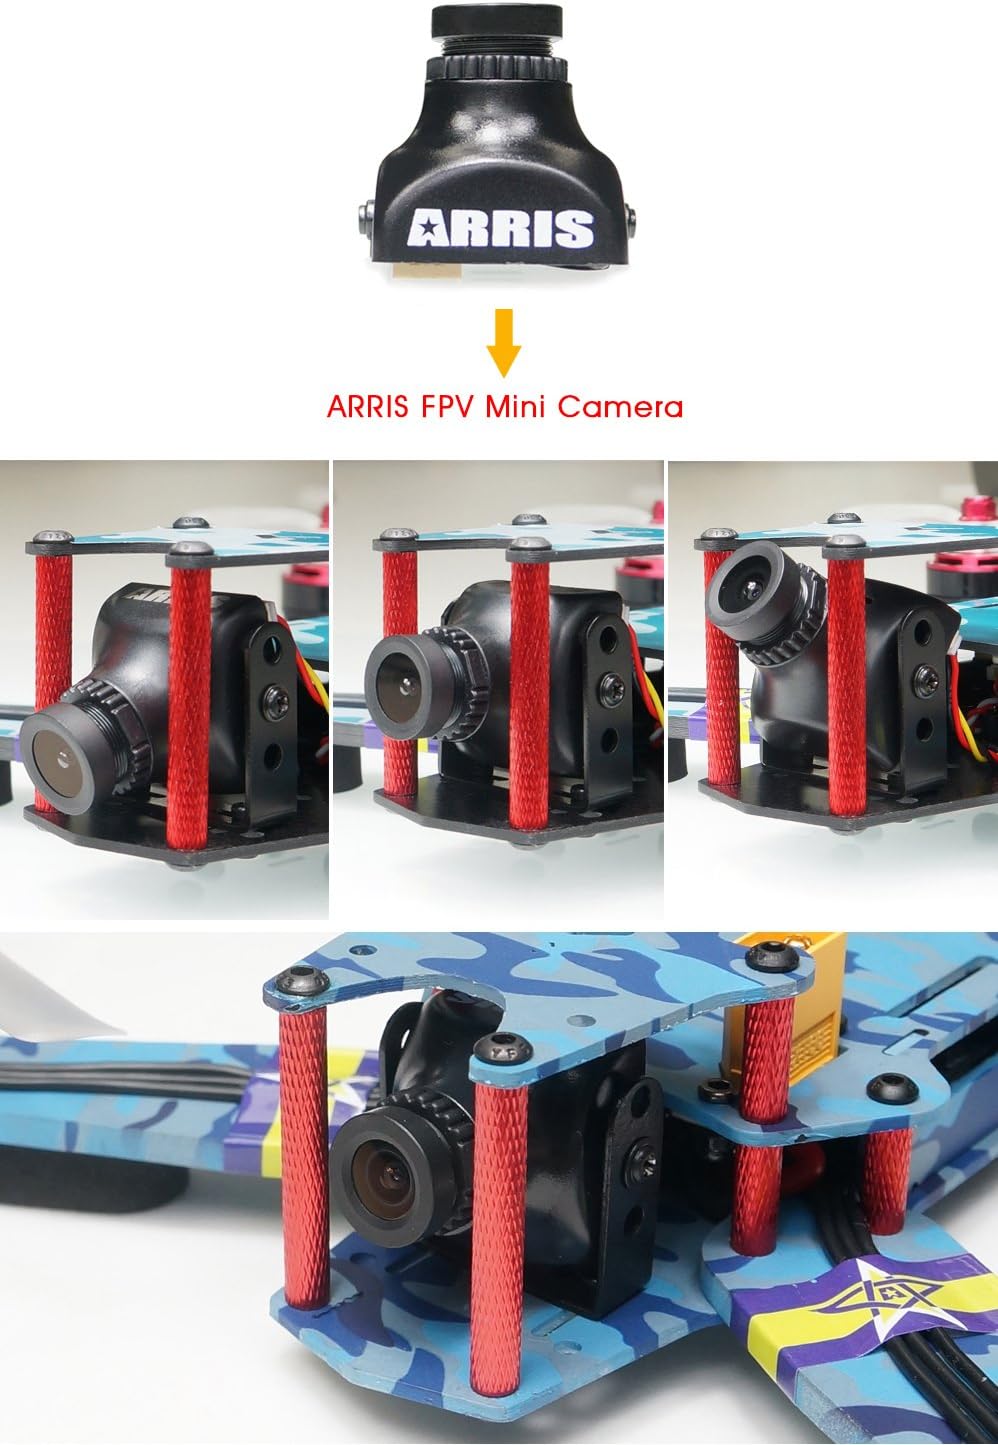
Figure 4: The ARRIS FPV Mini Camera, demonstrating its adjustable angle feature for optimal FPV viewing.
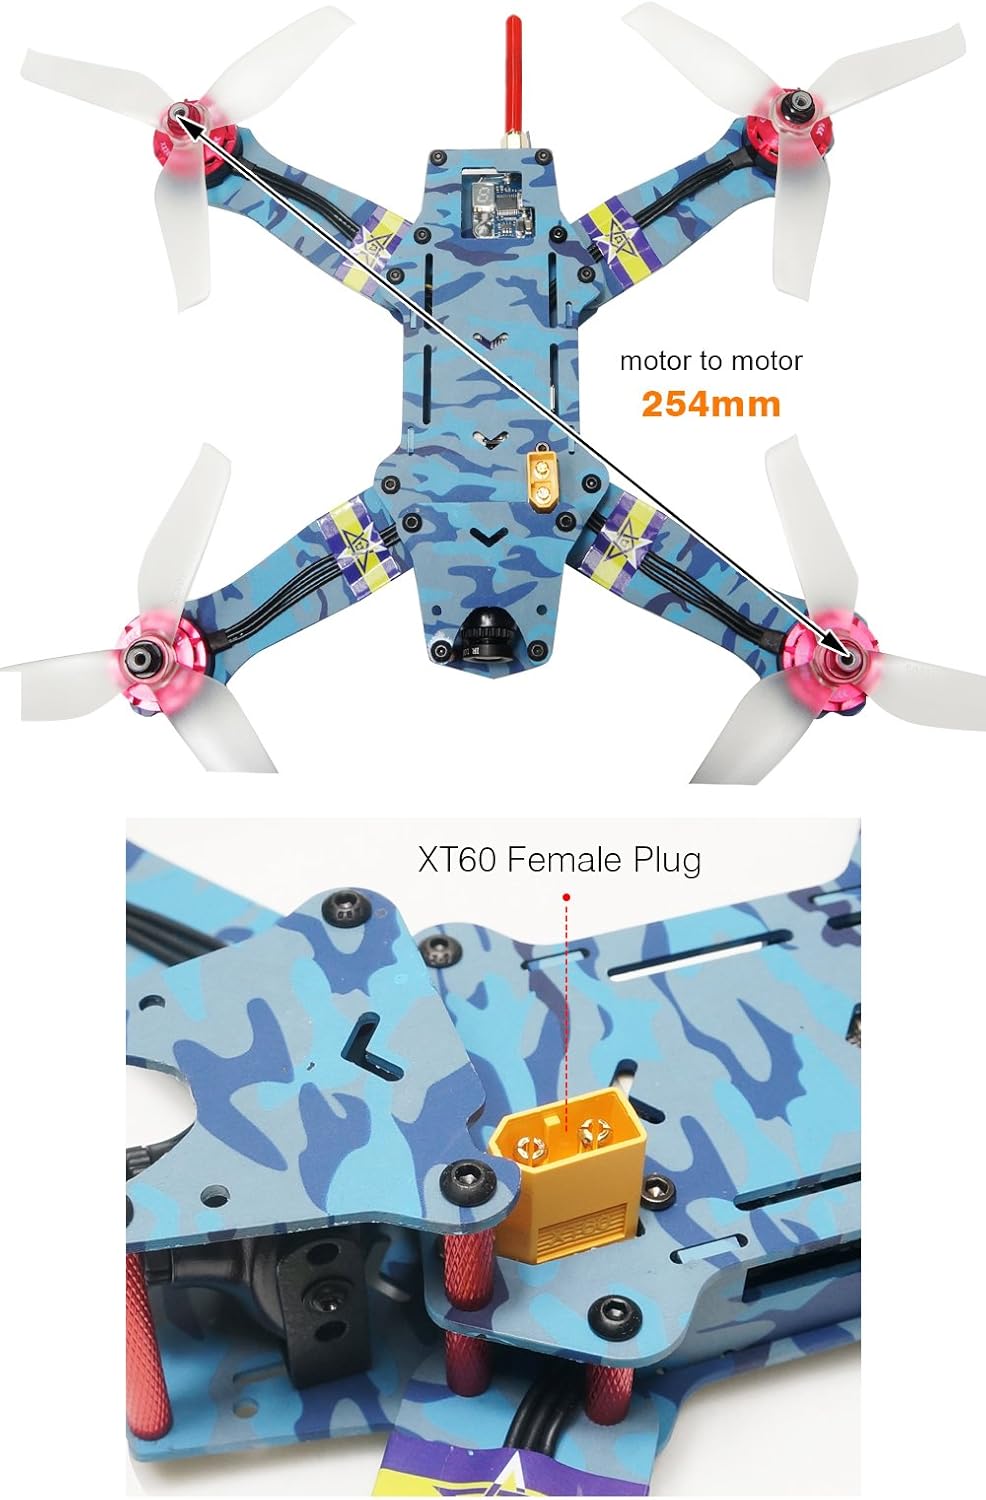
Umfanekiso 5: Phezulu-phansi view illustrating the 254mm motor-to-motor diagonal distance of the ARRIS C250 V2 frame.

Umfanekiso 6: Uhlangothi view highlighting the super narrow 23mm arms and the placement of the ARRIS FPV Racing 5.8G TX Antenna.

Umfanekiso 7: Ngaphambili nangemuva views of the assembled ARRIS C250 V2 drone, showcasing ukwakheka kwayo okuhlangene.
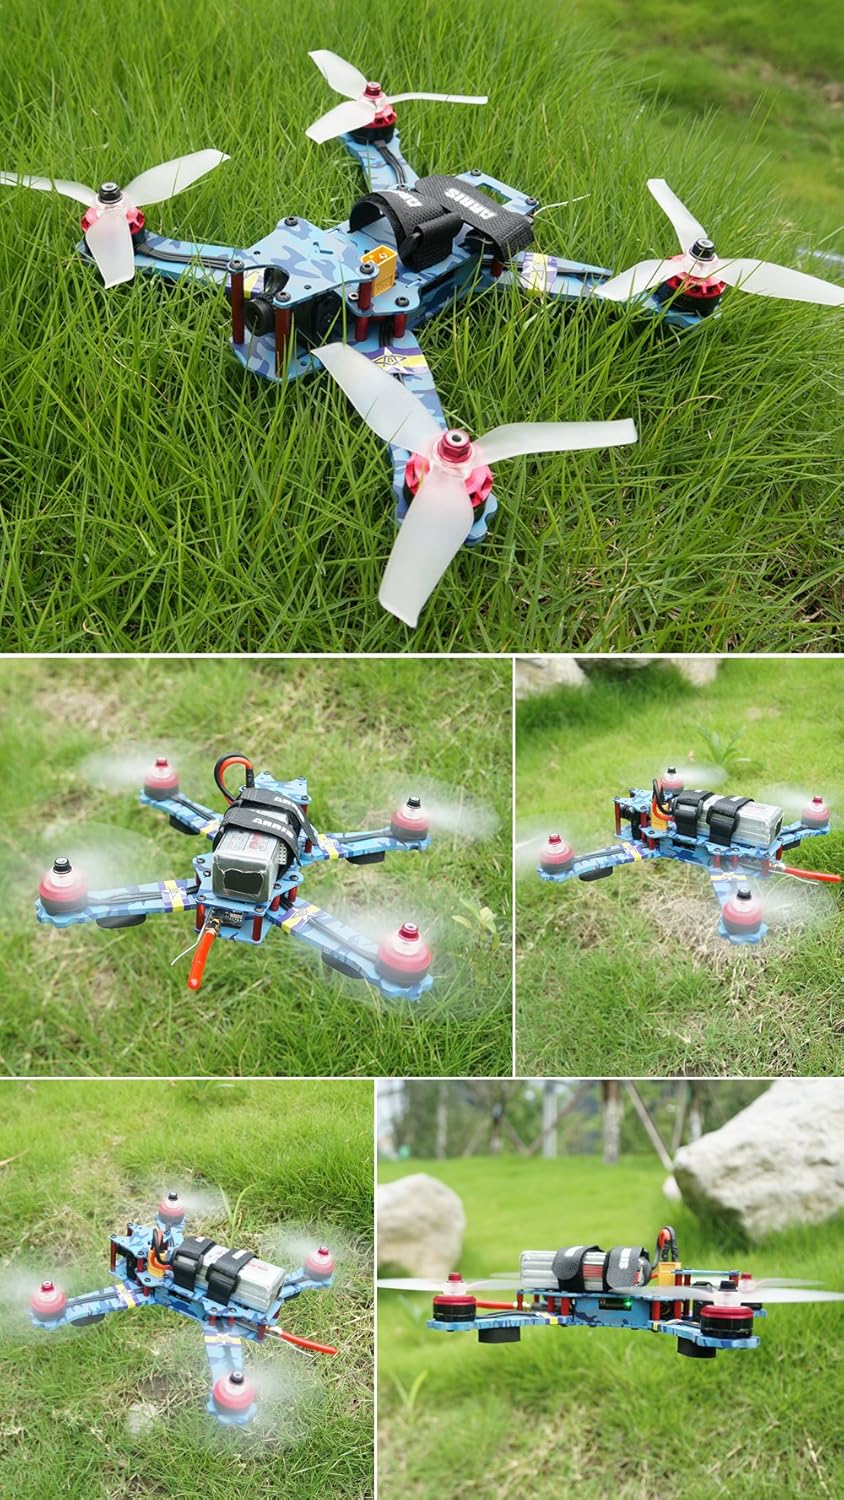
Figure 8: The ARRIS C250 V2 drone positioned in a grassy outdoor environment, ready for flight.

Figure 9: The complete package contents, including the ARRIS C250 V2 drone, Radiolink AT9 transmitter, 4S 1500mAh LiPo battery, and spare propellers.
Setha
1. Ukushaja ibhethri
The ARRIS C250 V2 includes a 4S 1500mAh LiPo battery. A compatible LiPo battery charger (e.g., Skyrc Imax B6AC V2, not included) is required. Always charge the battery in a fire-safe location and never leave it unattended during charging. Follow the instructions provided with your battery charger for safe operation.
2. Transmitter Setup (Radiolink AT9)
Your drone comes pre-bound to the Radiolink AT9 transmitter. Familiarize yourself with the transmitter's controls and switches. The default configuration typically includes:
- Ukuhlomisa/Ukuhoxisa izikhali: A three-way switch is usually assigned for arming the motors and switching between flight modes (e.g., Level, Acro).
- Ibhaza: A two-way switch may be assigned to activate the built-in buzzer for locating the drone after a crash.
Refer to the Radiolink AT9 manual for detailed programming and calibration instructions. While the drone is ready-to-fly (RTF), understanding your transmitter's capabilities is crucial for advanced control.
3. Ukufakwa kophephela
Ensure propellers are installed correctly. Each motor has a specific rotation direction. Match the propellers (clockwise/counter-clockwise) to the corresponding motors as indicated by the motor rotation and propeller markings. Securely fasten the propellers to the motors. Incorrect propeller installation can lead to unstable flight or loss of control.
4. Ukuhlola Ngaphambi Kokundiza
- Verify all propellers are securely attached and undamaged.
- Confirm the battery is fully charged and properly secured to the drone.
- Check that the FPV camera angle is set to your preference.
- Power on the transmitter first, then connect the drone's battery.
- Perform a range check of the radio control system in a safe area.
- Ensure the FPV video feed is clear and stable before takeoff.
Imiyalelo yokusebenza
1. Ukuhlomisa Nokwehliswa Izikhali
To arm the motors, move the designated arming switch on your Radiolink AT9 transmitter to the 'armed' position. The motors will typically spin slowly, indicating they are ready for flight. To disarm, move the switch back to the 'disarmed' position. Always disarm the drone immediately after landing or in case of an emergency.
2. Izindlela Zokundiza
The ARRIS C250 V2 typically supports multiple flight modes, configurable via the F3 Flight Controller. Common modes include:
- Angle/Level Mode: Provides self-leveling assistance, making it easier for beginners to control.
- Acro/Rate Mode: Offers full manual control without self-leveling, preferred by experienced FPV pilots for racing and freestyle maneuvers.
Switch between modes using the assigned switch on your transmitter. Start with Angle mode if you are new to FPV racing drones.
3. Izilawuli Zendiza Eziyisisekelo
The Radiolink AT9 transmitter uses standard RC control inputs:
- I-throttle (Inamathela Kwesobunxele Phezulu/Phansi): Controls motor speed and altitude.
- I-Yaw (Induku Yesobunxele Kwesobunxele/Kwesokudla): Rotates the drone horizontally.
- Pitch (Right Stick Up/Down): Tilts the drone forward/backward.
- Roll (Right Stick Left/Right): Tilts the drone left/right.
Practice these controls in a simulator or a safe, open area before attempting aggressive maneuvers.
4. FPV System Operation
Power on your FPV goggles or monitor after the drone is powered on. Ensure your FPV receiver is tuned to the correct 5.8GHz channel matching the drone's 5.8G 200mW TX. The OSD (On-Screen Display) integrated into the F3 Flight Controller will provide real-time flight data such as battery voltage, flight time, and current mode directly on your FPV feed.
Isondlo
1. Ukuhlanza
Regularly clean your drone to remove dirt, grass, and debris from the frame, motors, and electronics. Use a soft brush or compressed air. Avoid using liquids directly on electronic components.
2. Ukushintshwa Kophephela
Inspect propellers before and after each flight for cracks, bends, or chips. Damaged propellers can cause vibrations, reduce efficiency, and lead to unstable flight. Replace them with genuine ARRIS 5042 3-blade propellers.
3. Ukunakekelwa Kwebhethri
- Store LiPo batteries in a cool, dry place, ideally in a LiPo-safe bag.
- Do not overcharge or over-discharge LiPo batteries.
- Never puncture or damage LiPo batteries.
- If a battery becomes puffed or damaged, discontinue use immediately and dispose of it safely according to local regulations.
4. I-Firmware Updates
Periodically check the ARRIS official website or support forums for firmware updates for the F3 Flight Controller and Flycolor S-Tower. Keeping firmware updated can improve performance and add new features. Follow official instructions carefully when performing updates.
Ukuxazulula inkinga
- Drone does not arm: Ensure the transmitter is powered on, the drone battery is connected, and the arming switch is correctly engaged. Check for any error messages on the OSD or flight controller LEDs.
- Loss of signal/control: Ensure your transmitter antenna is properly oriented and not obstructed. Fly within the recommended range. Check for potential radio interference.
- Unstable flight/vibrations: Inspect propellers for damage or incorrect installation. Check motor mounts for looseness. Ensure the flight controller is securely mounted.
- No FPV video feed: Verify the FPV camera and video transmitter are powered on and connected. Ensure your FPV receiver (goggles/monitor) is on the correct channel. Check antenna connections on both the drone and receiver.
- Motor not spinning: Check motor connections to the ESC. Inspect the motor for physical damage. If one motor is faulty, it may require replacement.
For more detailed troubleshooting or complex issues, consult online FPV forums, the ARRIS support website, or contact customer service.
Imininingwane
| Isici | Ukucaciswa |
|---|---|
| Ibhrendi | I-ARRIS |
| Igama Lemodeli | Arris C250 V2 |
| Inombolo Yengxenye | I-CA0059 |
| Ibanga lobudala (Incazelo) | Umuntu omdala |
| Izinga Lamakhono | Uchwepheshe |
| Ubuchwepheshe bokuxhumana | Imvamisa yeRadio |
| Uhlobo Lokulawula | Isilawuli kude |
| Amandla ebhethri | 1500 millionamp Hours (4S LiPo) |
| Ukwakhiwa Kweseli Yebhethri | I-Lithium Polymer |
| Ukulungiswa kokuthwebula ividiyo | 1080p |
| Ifomethi yokuthwebula ividiyo | MP4 |
| Ubuchwepheshe be-Optical Sensor | CCD, CMOS |
| Okubalulekile | Plastic (Frame is Carbon Fiber) |
| Izingxenye Ezihlanganisiwe | Camera, Propeller, Remote Control |
Iwaranti kanye Nokusekela
For warranty information, technical support, or replacement parts, please refer to the official ARRIS website or contact your retailer. Keep your proof of purchase for warranty claims. Product specifications and features are subject to change without notice.
Ask a question about this manual
Ask about setup, troubleshooting, compatibility, parts, safety, or missing instructions. Manuals+ will review the question and use this page’s manual context to help answer it.