
1. Isingeniso
Thank you for choosing the OSD Audio PRE-1 High Definition Preamplifier. This unit is designed to enhance your audio experience by providing versatile source selection and precise audio control. The PRE-1 acts as a central hub for various audio components, including turntables, CD/DVD players, and tape decks, delivering a clean and powerful signal to your main ampokokuphila.
This manual provides detailed instructions for the proper setup, operation, and maintenance of your PRE-1 preamplifier. Please read this manual thoroughly before operating the unit to ensure optimal performance and longevity.
2. Ulwazi Olubalulekile Lokuphepha
- Umthombo wamandla: Xhuma iyunithi kuphela ohlotsheni lomthombo wamandla okhonjiswe kulebula yokumaka.
- Ukungenisa umoya: Ensure adequate ventilation. Do not block any ventilation openings. Install in accordance with the manufacturer’s instructions.
- Amanzi Nomswakama: Ungasebenzisi le divayisi eduze kwamanzi noma uyibeke endaweni evuzayo noma echithekayo.
- Ukushisa: Ungafaki eduze kwanoma yimiphi imithombo yokushisa njengama-radiator, amarejista okushisa, izitofu, noma ezinye izinto ezisetshenziswayo (okuhlanganisa ampama-lifiers) akhiqiza ukushisa.
- Ukuhlanza: Hlanza kuphela ngendwangu eyomile.
- Ukusevisa: Ungazami ukuletha lo mkhiqizo ngokwakho. Dlulisela konke ukwesekwa kubasebenzi bensizakalo abafanelekayo.
- Ukubeka phansi: Le yunithi kufanele isekelwe kahle.
3. Okuqukethwe Kwephakheji
Sicela uhlole ukuthi izinto ezilandelayo zifakiwe yini ephaketheni lakho:
- OSD Audio PRE-1 High Definition Preampokokuphila
- Ikhebula Lamandla
- Incwadi Yomsebenzisi (le dokhumenti)
4. Umkhiqizo Uphelileview
4.1. Iphaneli Yangaphambili
The front panel provides access to all primary controls and a microphone input for convenient use.

This image displays the front panel of the OSD Audio PRE-1 Preamplifier, including its physical dimensions for installation planning.

A enemininingwane view of the left side of the PRE-1's front panel, highlighting the Microphone Level, Bass, Midrange, and Treble adjustment knobs.

A enemininingwane view of the right side of the PRE-1's front panel, showing the Loudness, Balance, and Volume controls, along with input selection and function buttons.
- Inkinobho yamandla: Ivula noma ivale iyunithi.
- Ukufakwa kweMak: I-jack engu-1/4 intshi yokuxhuma imakrofoni.
- Izinga leMakrofoni: Ilungisa ivolumu yokufakwa kwemakrofoni.
- I-Bass Control: Ilungisa ukuphuma kwemvamisa ephansi.
- Mid Control: Adjusts the mid-range frequency output.
- I-Treble Control: Ilungisa ukuphuma kwemvamisa ephezulu.
- Isizotha: Engages or disengages a loudness contour for enhanced bass and treble at low volumes.
- Ibhalansi: Adjusts the left/right channel balance.
- Ivolumu: Master volume control for all outputs.
- Okokufaka Khetha: Rotary knob to choose between Phono, AUX1, AUX2, and CD/DVD inputs.
- Tape Button: Activates the Tape Monitor loop.
- Inkinobho ye-Mono: Combines stereo signals into a monaural output.
- Isihlungi Esiphansi: Engages a low-frequency cut-off filter.
- Thulisa: Silences all audio output.
4.2. Iphaneli yangemuva
The rear panel houses all the necessary input and output connections for your audio system.
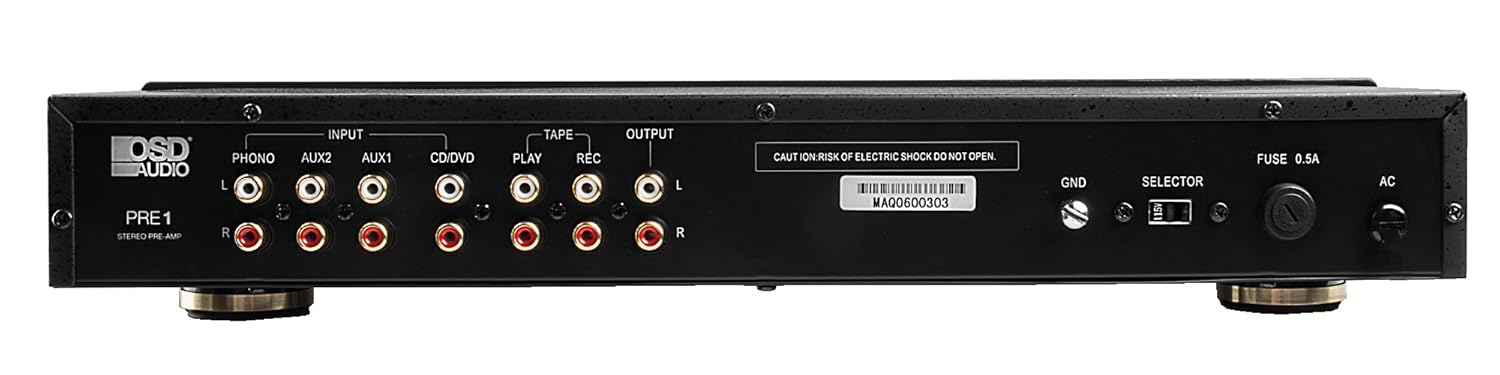
The rear panel of the PRE-1 Preamplifier, showing all input and output connections for various audio devices.
- Phono Input (L/R): RCA inputs for connecting a turntable. Includes a ground terminal.
- AUX1 Input (L/R): RCA inputs for general auxiliary devices.
- AUX2 Input (L/R): RCA inputs for a second auxiliary device.
- CD/DVD Input (L/R): RCA inputs for CD or DVD players.
- Tape Play (L/R): RCA inputs for the playback output of a tape deck or other recording device.
- Tape Rec (L/R): RCA outputs for connecting to the recording input of a tape deck or other recording device.
- Output (L/R): RCA outputs to connect to your main power ampokokuphila.
- Ground Terminal (GND): Connects to the ground wire of your turntable to reduce hum.
- Ukushintsha Isikhethi: For internal configuration (typically left in default position unless specified).
- I-Fuse: Replace only with the specified fuse type and rating.
- Ukufaka Amandla we-AC: Connects to the supplied power cable.
5. Isethaphu kanye Nokuxhumana
Follow these steps to properly set up your OSD Audio PRE-1 Preampophilayo:
- Ukubekwa: Place the PRE-1 on a stable, flat surface, ensuring adequate ventilation around the unit. Avoid placing it near heat sources or in direct sunlight.
- Cisha ugesi: Ensure all audio components, including the PRE-1 and your main amplifier, are turned off before making any connections.
- Xhuma Imithombo:
- Ukuguquguquka: Connect the RCA cables from your turntable to the Phono Input (L/R) on the PRE-1. Connect the turntable's ground wire to the GND terminal on the PRE-1.
- Isidlali se-CD/DVD: Connect the RCA cables from your CD/DVD player to the CD/DVD Input (L/R).
- Other Devices (e.g., Streamer, Tuner): Connect RCA cables from these devices to the AUX1 Input (L/R) or AUX2 Input (L/R).
- Tape Deck: Connect the playback outputs of your tape deck to the Tape Play (L/R) inputs. Connect the recording inputs of your tape deck to the Tape Rec (L/R) imiphumela.
- Xhuma ku Ampophilayo: Xhuma i- Output (L/R) RCA jacks on the PRE-1 to the input jacks of your main power ampokokuphila.
- Ukuxhuma kwamandla: Xhuma ikhebula lamandla onikeziwe ku- Ukufaka Amandla we-AC on the rear panel of the PRE-1, then plug it into a suitable wall outlet.
- Amandla Okuqala Avuliwe: Turn on your main power amplifier first, then turn on the PRE-1. When powering off, turn off the PRE-1 first, then your main ampokokuphila.
6. Iziqondiso Zokusebenza
Once your PRE-1 is connected, follow these steps for basic operation:
- Khetha Okokufaka: Sebenzisa i- Okokufaka Khetha rotary knob on the front panel to choose the desired audio source (Phono, AUX1, AUX2, CD/DVD).
- Lungisa Ivolumu: Qala nge Ivolumu knob at its minimum setting. Begin playing your selected audio source and slowly increase the volume to a comfortable listening level.
- Izilawuli zethoni: Sebenzisa i- I-Bass, Mid, futhi I-Treble knobs to adjust the tonal characteristics of your audio. Turn clockwise to increase, counter-clockwise to decrease.
- Ukulawula Ibhalansi: Lungisa i- Ibhalansi knob to fine-tune the left and right channel output for optimal stereo imaging.
- Isizotha: Cindezela inkinobho Umsindo button to activate a contour that boosts bass and treble frequencies, which can be beneficial at lower listening volumes. Press again to deactivate.
- Isihlungi Esiphansi: Cindezela inkinobho Hlunga okuphansi button to engage a filter that reduces very low frequencies. This can help eliminate rumble from turntables or other unwanted low-frequency noise. Press again to deactivate.
- I-Mono: Cindezela inkinobho I-Mono button to combine the left and right stereo channels into a single monaural signal. This is useful for playing mono recordings. Press again for stereo.
- Thulisa: Cindezela inkinobho Thulisa button to instantly silence the audio output. Press again to restore sound.
- Ukusetshenziswa kwemakrofoni: Plug a microphone into the Okokufaka kwemakrofoni. Adjust the microphone's volume using the Izinga leMik ingquza.
- Tape Monitoring/Recording: If you have a tape deck connected, select the appropriate input for playback. To record, ensure your tape deck is set to record and the PRE-1 is passing the desired source through the Tape Rec outputs.
7. Isondlo
Proper care and maintenance will ensure the longevity and optimal performance of your PRE-1 Preampokokuphila.
- Ukuhlanza: Use a soft, dry cloth to clean the exterior of the unit. Do not use liquid cleaners, aerosols, or harsh chemicals, as they may damage the finish or internal components.
- Ukungenisa umoya: Periodically check that the ventilation openings are free from dust and obstructions.
- Izixhumanisi: Occasionally check all cable connections to ensure they are secure. Loose connections can lead to signal loss or interference.
- Isitoreji: If storing the unit for an extended period, disconnect it from the power outlet and store it in a cool, dry place, away from direct sunlight and extreme temperatures.
8. Ukuxazulula izinkinga
If you experience issues with your OSD Audio PRE-1, refer to the following common problems and solutions:
| Inkinga | Imbangela Engenzeka | Isixazululo |
|---|---|---|
| Awekho amandla | Power cable not connected; Power outlet not active; Blown fuse | Ensure power cable is securely connected. Test the outlet with another device. Check and replace the fuse if necessary (refer to specifications for fuse type). |
| Akukho okukhipha umsindo | Incorrect input selected; Volume too low; Mute engaged; Loose audio cables; Main amplifier off or incorrect input selected | Select the correct input source. Increase the volume. Disengage Mute. Check all RCA cable connections. Ensure your main amplifier is on and set to the correct input. |
| Umsindo ohlanekezelwe | Volume too high (clipping); Incorrect tone control settings; Faulty cables | Reduce the volume. Adjust Bass, Mid, and Treble controls to neutral or desired settings. Try replacing audio cables. |
| Umsindo ohumuzayo noma obhayizayo | Ground loop; Loose ground wire (Phono); Interference from other electronics | Ensure turntable ground wire is connected to the PRE-1's GND terminal. Try moving the PRE-1 or other audio components away from power cables or other electronic devices. Use a ground loop isolator if necessary. |
| Imakrofoni ayisebenzi | Mic not connected; Mic Level too low; Faulty microphone | Ensure microphone is securely plugged into the Mic Input. Increase the Mic Level. Test with another microphone if available. |
9. Imininingwane
Below are the technical specifications for the OSD Audio PRE-1 Preampophilayo:
| Isici | Ukucaciswa |
|---|---|
| Imodeli | NGAPHAMBI KWE-1 |
| Ibhrendi | Umsindo we-OSD |
| Inombolo Yeziteshi | 2 |
| Uhlobo Lokukhweza | INtaba Engaphezulu |
| I-UPC | 819603012446 |
| ASIN | B01MPYJLPX |
| Umkhiqizi | Umsindo we-OSD |
10. Iwaranti kanye Nokusekela
OSD Audio products are designed for reliability and performance. For specific warranty details and terms, please refer to the warranty card included with your product or visit the official OSD Audio website. If you require technical assistance or have questions not covered in this manual, please contact OSD Audio customer support.
OSD Audio Customer Support: Please visit the OSD Audio webindawo yolwazi lokuxhumana nezinsiza zokusekela.